News and Events

Keep up to date with Steve Nurse's designs and 3d printing.

Friday, 26 November 2021

Holey Dollar Octahedron


Finished! Octahedron with large Holey Dollar (side) and small Dump (truncation) construction. 8 Holey Dollar sides and dump truncations. 3d printed hinges surround each face, and geometry is determined by the truncation diagram and table shown in an earlier post.

Octahedron with cd sides and  nexorade knitting of vertices as support, see here

Octahedron with cd sides and bicycle cog truncations, see here

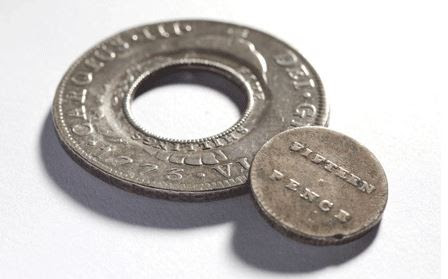
Holey Dollar and Dump, a historical coin system from New South Wales.

A glued pin from bicycle spokes and spoke nipples are the edges / hinge pins.  Here, some cut up spokes are ready for processing

Spokes with spoke nipple in place and cropped for length. Nipples are superglued to the spokes.

Holesaw set, trial Holey Dollar and Dump.

Measuring parts and dollar blanks. The disc od's are used in hinge designs.

Drilling the dollars

Cube made from dumps.

Ready to assemble. Half hinges are held to sides by hair elastics (strong rubber bands)

Halfway through

Done!

Hi

For a while I've been making platonic solid shapes using circles as sides. After a while, I realised that 2 of the solids - octahedron and icosahedron - are hard to make using this method because the sides don't join together in reinforcing triangular 3d groups. For these solids, some reinforcing is needed, and truncation works well. Here are some octahedrons I made before:  one here with bike cogs as truncations, and this one with knitted corners.

Since making those constructions, I've improved the edge pins by making them from threaded bicycle spokes, and they don't come out now!

So this post shows the latest version. A few days ago I worked out that the octahedron truncation circles could come from the face circles, it just needed a bit of calculation to work out whether the sizes I could make with my holesaws would work. And I found a suitable size, did the 3d cad and printing required, and a few days later, voila it all works. The construction reminds me of the Holey Dollar and Dump, an early New South Wales coin set where a small coin is manufactured from the centre of a large one.

The same construction pattern could be used for a truncated icosahedron - a version of this one - but that is quite a bit bigger. 

For now I want to make an octahedron with dump sides made by drilling the main sides off-centre. This will make the truncation sides have 2 holes, making clues as to the origin of the truncation sides. I can just make and varnish the sides, and use the pins, hinges and hair elastics shown above. Otherwise I can make the whole thing which involves being a slave to the 3d printer for about 24 hours. At the moment I'm inclined to make it from scratch.

Regards

Steve Nurse

Regards

Steve Nurse

Thursday, 25 November 2021

Shredder Switch


Hi

There have been a few energy efficiency drives here in Victoria, and one of them has been free replacement of incandescent and flouro lightglobes with light emitting diodes. And our household has been offered that several times but we have declined, but one day I will do the job myself. Anyway I decided to another small energy saving job, and that is to put a switch before the transformer of our paper shredder. In its existing setup the transformer is always powered and warm.

The shredder had already been modified, it used to have a small plastic bucket, but that's been replaced by a large wooden one. There was an old light switch outside and yesterday I bit the bullet and did the mod. It all works ok, I'm happy with it!

Regards


Steve Nurse

Monday, 15 November 2021

Radiogram conversion


Hi

This is a post about something I made years ago, a conversion of a Radiogram which originally had an AM radio plus mono record player, to an up to date music player which plays cds, cassette tapes, am and fm radio, records and digital files via usb or sd card.

The unit looks good and works well, and it's mainly used for playing records. We gave an EP of Old Man River by Paul Robeson a go a week or so ago.  

This is the second stereo system to go in the case, and this one came from Aldi, cheap and cheerful as stereo systems go, about $300. 

The radiogram was cut at the top to give access to the record player. Its a bit rough and I think I could do more work to improve it, but its ok for now.

Regards Steve Nurse

Thursday, 11 November 2021

Let's go big again!

Pvc pipe as seedling snail protector in the garden. Not recommended, snails have still eaten our bean seedlings.


Triangular sides from 27 inch bicycle rims. I first made one a few weeks ago, and the over / under rim pattern and its inspiration is shown here.

Southern Bearings helped me a lot! They didn't have what I needed, but were happy to get it in, and I was able to pick up the m6 tee nuts a few hours later. Much better service than a couple of other shops.  


3 sides lashed together using new pvc pipe and velcro.


Which is the killer ap, this clothesline........

or this bike stand?


Anyway, my wife Christine and her friend Chris like the clothesline.

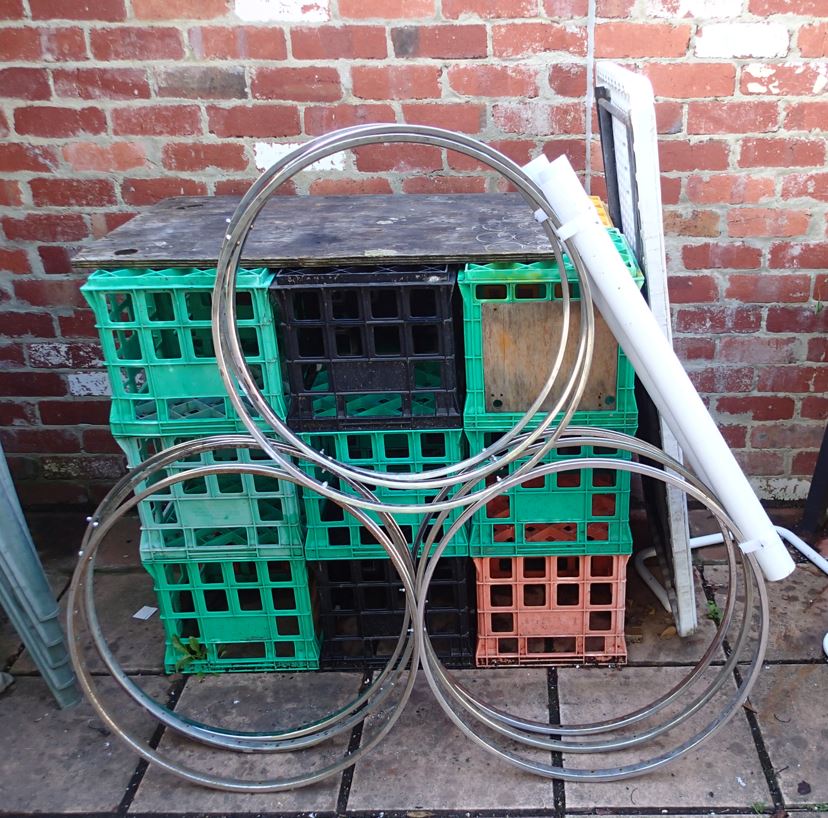
These are the sides. The large tetrahedron needs to be take-apartable, otherwise it would have to be removed from the house by putting it over the back fence.

One of the sides together with the creation from yesterday's blog post.

Fitting the sides in the back of our Kia Rio. It needs a bit of limbo to get them in, but they fit. Just.


Hi

Following on from making a one-rim per side tetrahedron from cycle rims, I've gone ahead now and made a 3 rim per side model. I had made a side several weeks ago , and it had been sitting round till I got motivated. Building a small tetrahedron proved to be the catalyst, I just continued on from there and made the larger version. Plus I thought it would make a good cubby house for my grandson, or maybe a couple of grand-nieces and nephews.

So everything I've done with cds (125mm diameter) should also be possible with bike rims (about 650mm diameter), for example, the top join in the cd tetrahedon stack shown here is a part of the clothesline app shown above. There is a triangular truncation of the tetrahedron corners, and the 2 tetrahedrons are joined using this truncation. Anyway, I'll try to put some more details of the construction soon.

This construction was mostly done by seat of the pants, that is position things against other things, then mark and drill and saw accordingly. But not entirely, I did some graphic assisted calcs on what the angles between the sides of tetrahedrons are to work out hole positions, see below. Also I only made 3 tetrahedron sides, the 4th is virtual or implied by the edges of the other 3, or the ground becomes the other side.

Regards

Steve Nurse

Update, Nov 21, 2021

The big tetra has been updated with a complete spoked wheel with a cd turbine, and put on impromptu display in Batman Park during my regular Saturday volunteer session for Wecycle. Story with video in bikes blog here .

Regards

Steve Nurse


Wednesday, 10 November 2021

Tetrahedron from bicycle rims


Hi

A while ago, I realised that if cd's and other round things can be incorporated into tetrahedrons and all the other platonic solids. And really, there aren't too many limits on that, and any disc or hoop could be built up into the form other shapes. Up till now I just did small parts, but I wanted to demo something larger for some writing I was doing. Months ago, I collected some 27" wheels from the Ceres bike shed, and for the most part just stored them. 

So here are the results of a first experiment making a solid from a bike rim. The 27" rims seem to be all drilled with 36 holes plus the valve, and that makes it easy to space the rim joiners (about 100mm of 50mm diameter steel tube in this case) and it all worked ok. I used 3/16" bolts for this, and the spoke holes had to be drilled out a bit to take these bolts but that's not hard. 

It takes weight fairly well, I'm 80 kg or thereabouts and can sit on it fine.

All for now, regards  Steve Nurse

Monday, 18 October 2021

52t Clock


Hinge pins on production line

Hinge assemblies

Hi

A while ago, I made a tetrahedron clock from some old bicycle disc brakes. It all went together, and I thought I could donate it at a prize at a bike event. But one bicycle-themed clock trophy would not be enough, as I would want to donate a trophy for male and female winners. 

So I've been fossicking in my bike junk and cd-rom piles and have gathered together a few suitable candidates for the next clock, and then in the last day or so have put it together. 

The new tetrahedron has 2 sides which are upcycled 52 tooth bicycle chainrings, and 2 which are upcycled timber chainring guards, which are shown in my bikes blog posts such as this one. I trimmed the timber guards in the lathe, something I've never done before, but it worked ok this time.

Anyway, it all came together well, although the clock isn't actually telling the time properly yet.

The image on the cd is a little thing Leonardo Da Vinci whipped up called Vitruvian Man. On the cd he is already poorly treated by being chopped in half and placed in a bicycle sprocket, and looking at the photos, I realized I had mistreated him again by giving him blue tracky dacks to wear!

Personally I like it! A trophy that doesn't take itself too seriously.

Update October 19

This morning I've taken the clock apart to fix the mechanism (I think the rubber bands used to hold the edge joiners in place are straining it too much) and realised the clock looks perfectly fine with just the cd and one chainring as below. Its a bit less complicated that way. Anyway, no need to make a decision yet as to which way to present it.


Regards

Steve Nurse

Tuesday, 12 October 2021

Mylar constructions


With tools, a paper cutting guillotine and Mylar, and m3 nylon fasteners...


made this, a

cube / octahedron, which is now...

with all the other dangly things outside the kitchen window.

View from below. It's held up by a bicycle gear cable, and a nylon nut is a meant to be a low-friction bearing.


Hi

A few weeks ago, I made some cantellated forms from playing cards, and realised that the designs could be taken further, or even moved outside if they were made of different material. I had a roll of Mylar material left over from my time as an engineer at CMG / Regal in Rowville. The plastic film goes between steel laminations and copper wires to stop fires and other disasters happening.

Anyhow to go with the mylar I wanted some plastic fasteners, so bought m3 nylon nuts and bolts through ebay. They all took a while to arrive, but I was quite grateful for the think time before starting to make more things. Finally I got motivated, and made what you see in the photos above. The equatorial panels are folded on one edge to catch the wind, and rotate in the wind.

But no rotation to date, it hasn't been windy, and the fan bits aren't very big, so I can redesign if necessary.

Anyway very pleased with the way the photos came out, I like the transparency of the mobile, and there will be more to follow.

 Update October 16, 2021

New layout with extended fans. Just visible here is a map of Australia in outline, put in by piercing the Mylar with a centre punch.

Globe features now include rotating on a vertical axis, and Australia in the Southern Hemisphere. And fragility.

Settled on an Australian map showing Aboriginal Australia. It has been this way for the last 50,000 years or so with the exception of the last 300 or so.


I did a bit of rearranging of cube / octahedon and have now christened it a globe. By extending the fan blades compared to the top photos, and also adding  string to the bicycle gear cable, the globe now rotates and sways with gay abandon. Very pleased, and I plan to make a few more versions. Here is a short video, it moves quite nicely.

Regards  Steve Nurse