 |
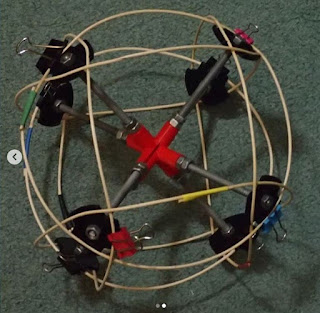
| 1 Almost there! Bamboo is clipped to jigs while superglue is applied to attach bamboo pieces to each other. |
 |
| 2 Later the jigs were removed and the whole thing stays together |
 |
| 4, Done |
 |
| 5. Starting off: assigning node numbers using the plan. |
 |
| 6 The full set of central jigs for this polyhedron style, top to bottom are dodecahedron, icosahedron, cube, octahedron, tetrahedron hard to see in black. |
 |
| 7 Cube made using the same technique. |
Hi
For a few days now I have been gathering parts to make a twin edged dodecahedron from a single knot. I've known this is possible for a while, and have had the basic parts to make it designed and / or on hand for a while. The key parts are a 20 sided 3d printed jig which holds m6 althread rod ( I have made these for all the Platonic solids, see 6 above) and a node jig to which bamboo rod can be clipped.
There was quite a bit of work, designing the pattern, sawing allthread rod, attaching it to the centre piece, attaching and numbering jigs, then attaching and glueing bamboo, and finally jig disassembly.
I'm finishing writing an article on these, for the current draft version, see here , and I have done a few blog posts such as this as well. Bit of a slog getting the article finished as its all computer work and not the light relief construction brings.
regards steve nurse
Update June 4
With the full jig available and ready to go, I thought it a pity not to keep going and make a few more dodecahedrons. This time I planned for a different switching arrangement (see article in link above) with 6 twin - circle elements made of cane, each in a sort - of figure of 8 pattern. One of these is finished now and I plan to make one more. The one I have made uses 6 3d printed plates to contain and tidy up all the basket cane loose ends.
The 2mm basket cane I use came from a marine supplier. The bundles have to be separated into strands, and the strands are just long enough to make the figures of 8. Mary took some of the pictures.
Update June 26
I have now almost finished 2 lamps for the exhibition " design fringe ". Some of the diagrams presented above have been used to decorate the shade. The bottom diagram was shown above but now includes a couple a new feature which shows where the path for the cane is predetermined, and there's no need to look at the guide to work out the next step. Firstly, the path is determined by the numbers in circles where the node numers mtch up with the step numbers. This breaks down after a while, but then later if one potential side of the cane's path is occupied it has to go through the other - this is shown by squares around numbers.


No comments:
Post a Comment