News and Events

Keep up to date with Steve Nurse's designs and 3d printing.

Monday, 10 July 2023

CD-MATIC


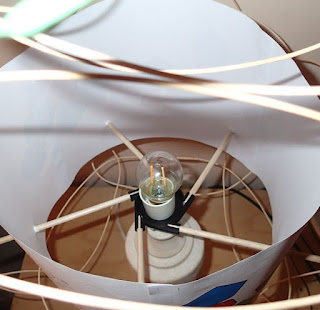
Lampshade for Design Fringe........
 
Uses this black 3d printed centre piece......

which is repurposed here in the MKI CD-Matic

made mostly from makittoy


Hi

A few weeks ago, I was making a lampshade using some 3d printed bits I'd designed and made, and decided to play around with them a bit, and made a "thing" with the help of some Makittoy kits I have kicking around the kitchen. I had some left over bits of 6mm dowel which were used as the rods to connect the 2 sides, and the other rods and connectors were Makittoy.

It didn't really seem to have a use, so I put it on the kitchen table and used it to support a cylindrical Makittoy container. My girlfriend Mary, who'd seen me make the thing, later, and much to my delight - put some cd's on it. 

Aha - this is the killer app for this thing, and I made a small paper label for it saying K-Tel CD-Matic, something I stole (the K-tel bit) and made up (the CD-matic bit, somewhat reminiscent of the K-Tel Record Selecta)

And you know, being an engineer, just making a thing like that is not enough, I had to make it better, and drew and made some corner pieces for the new CD-matic, and replicated all the Makittoy rod lengths in 6mm dowel as a start on a new MKII Cd-Matic

Coincidentally at about the same I did Mary a demo of 3d printing by uploading some prints from thingiverse with the theme of Newfoundland dogs. (Yes, there is everything!) One design in particular (here) lent itself to printing in 2 colours to make the raised section at the top contrast with the lower base, and I managed to print off a few "Newfie" tags like that and pass them on to Mary.

So the "Newfie" tags got me using a technique I hadn't used before, and I decided to use it to make the labels for the Cd-matic. Its quite tricky swapping over colours in the printer as it takes a minute or two to cut the filament of the first colour, feed the second colour into the extruder, and for the extruder to start churning out the second colour, so my first attempt failed to have a second colour. Second and third attempts were better though, by the time I had started them I'd put in a wide border around the part which uses a bit more filament and makes the timing less critical.

With the new labels on, Cd-Matic was ready to go!

Wednesday, 5 July 2023

Nanotube tiling

 Hi

1

For a  while I've been making some sphere like things from cane, and these are actually twin edged platonic solids, and this draft article from this post about a year ago started to classify them. I've been learning more about them since, and in the last post made item 3.3 from the table above, a dodecahedron. I have also built 1.33.3 (tetrahedron and cube and am now moving on to a version of 4.3.

2. Stylised / cutout forms of parallel face shapes.


So having built all the solid "platonic solid shapes" in the series (1.3. 2.3, 3.3) how about the planar one, 4.3? Its possibly the most interesting of all because in its rolled form (ie opposite edges of pic 4.3 are joined to form a circle)  it is the shape of a carbon nanotube. The wikipedia page and this article show the various forms of carbon nanotube, which are called "Armchair" and "Zigzag" and are flavoured by spirals. So before launching into making cane models, I decided to make 3d printed ones.  These will help me design and build the jigs for the cane versions.

The designs shown below can be made by 3d printing using the "hex" thingiverse file available here. (The file is a recent addition to the 3d printable construction set). First parts were printed, then they were assembled in sheets using orange 3d printer filament as pins between parts. Finally, sheets were rolled and edges were joined, again using 3d printer filament. Sheets could be Zigzag or Armchair. Plain joining created cylinders while displaced joining created spirals.

All the rolled parts have a resistance to rolling created by conflicting surfaces within the structures. This is something already observed and explained in non-hexagonal cylinders, see the pdf available on the thingiverse page.

3. Plain zigzag (style nanotube model)

4. Compatibility of hexagon with other pieces from the Thingiverse set. Parts at the top are the small equisided triangle.

5. Zigzag with spiral


6. Zigzag before rolling. (the top edge is zigzag)

7. Armchair before rolling (the top edge is armchair)

8. Plain Armchair

9. Armchair with spiral

Update July 6

10. Cad model for central jig for cane model nanotube. Aiming to print this within a few days. It is....


11 derived from the red / central jig seen here being used to make an octohedron. The shape is 5.3 in the table shown at the top

I've now designed a jig to make a cane model of a nanotube. The tiling nanotube pics on this page have helped me work out what to build and how to build it. I will start with the zigzag cylinder as modelled in 3. More blog posts to follow.

Now that I've done one hex shape, I can see the sense in doing another hex and 2 pentagons to fill in the gaps in the construction kit. When time allows!

PS: as a reference for the Nanotubes, here are 2 pages from Noel Graham's excellent book "Mathematics with Geoshapes", published in 1998.

12

13